Searching for Thymol recepies.


Home Made Apiguard (Thymol base anti-varroa component)

Source: http://www.beekeepingforum.co.uk/showthread.php?p=20371

I don't accept responsibility for these recipes, Thymol is a complicated chemical because varroa and honey bees have a similar level of tolerance what complicates its effectiveness and Thymol strength is dependent of temperature so quantities can have diverse effects according to the climate where it is used.

Important:  Handle Thymol with care - avoid skin contact using globes and eye contact using glasses, don't mix the components in a windy place or in poorly ventilated room, don't leave it at the reach of children or in unlabeled jars. Don't apply the Thymol if you have the suppers on. If you treat with Thymol you risk to harvest Listerine honey, what saves you money in mouthwash but might put your friends off your honey so before you set the suppers, uncap the honey stores of the brood chamber so the bees move the stores to the supper chamber (in national and half hives), after set the suppers for harvesting. I tend to leave a supper of food for the bees so I normally harvest the top supper only and I avoid this way possible contamination of thymol in the honey.

Method 1. Diluted in Surgical Spirit - very quick evaporation - kills some bees so better to apply it in the evenings.

Basic formula: 2 Parts Thymol / 1 Part Surgical Spirit. Thymol doesn't dissolve in water but it does in Isopranol/Alcohol/Surgical Spirit. It doesn't matter the amount of Surgical Spirit you use, just enough to dilute the Thymol. What its really important is not to put more than 8 grams of Thymol per hive. If you do a solution too weak you can always repeat it later and to adjust the recipe according to your own experience and local weather conditions but if you do the solution to strong (if you put to many grams of Thymol in the hive diluted in spirit) you are going to cause a serious damage to your hive. After an overdose the bees get suffocated, the thorax turns white and you find them outside the hive dead or really weak. There are people out there advising to set the Thymol on the top of the brood frames, however, I prefer so set the Thymol clothe on the top of the supper (in national a a half) , over the  queen excluder.

Overdose can kill bees in excess so it is important to be precise with measurements. You can purchase a precise scale in Ebay for 7 pounds.

Recipe for 1 hive:  8 grams Thymol + 16 ml Surgical Spirit. Get the Thymol well diluted so if you need to add more spirit do, as long as you don't put more than 8 grams per hive.

Procedure: Dissolve the Thymol in the Surgical Spirit and use syringe to get 8 ml in a kitchen towel, use 2 towel per hive.

Application: Every 14 days until the varroa mite drop come to normal for the period of year.

Precaution: Use this treatment with mild temperatures. 


Source: http://hertsbees.blogspot.co.uk/2007/07/thymol-varroa-treatment.html


Method 2.


Ingredients for 1 hive: 
No more than 8 grams Thymol crystals.
20 grams of vegitable oil.
60 grams of sugar

You can add adjust those measurements as long as you don't increase the grams of Thymol per hive, the aim is to create a sticky paste of sugar and oil.

Put the sugar in coffee beans processor to make it more thin and after put it into a freezer plastic bag container , after, thoroughly mix in the Thymol crystals with the sugar until all lumps of the Thymol are broken down. Because you can zip the plastic bag you avoid to get intoxicated. Add the sugar/Thymol mixture to a jar with the oil and mix thoroughly until the mixture is the consistency of a paste.

Usage
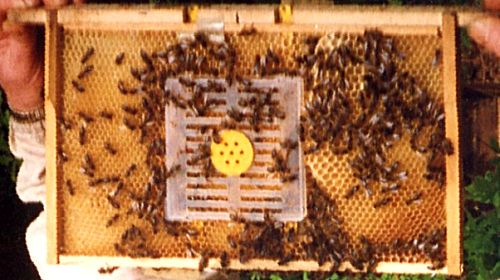
Cut a square of thick plastic and fix it to the top of the frames with a pushpin or similar, spread the solution on the plastic. Refresh the mixture very 14 days.


Frames collected from a hive that have collapsed during winter time.

Frames collected from a collapsed hive during winter time.
AFB and EFB test have resulted negative.

Pic 1. The majority of the cells in the center of the frame are empty brood cells. There are capped brood cells that don't show a well defined pattern. The brood inside that cells is chilled out (Pic 4). There is a honey reservoir on the top left hand corner. There are white cells in small quantity in several frames (Pic 3). Between the honey store and the brood cells there is an area of orange cells not capped which content is unknown to me.


Pic 2


Pic 3. It can bee appreciated the head of dead bees out of the brood cell. On the left the yellow cells.


Pic 4. Head of a bee inside a capped brood cell. The bee is chilled out. When I collected the frame I noticed that the frame was unexpectedly cold for being a frame with brood. Some of the bees had their heads out of the capped cells but they were dead.


Pic 5. Dead larvae inside chilled out cell.


Pic 6. The orange uncapped cells.


Pic 7. The yellow uncapped cells.


Pic 8. The white cells.


Pic 8. Another white cells which content seems to indicate that the white stuff is formed from a larvae.


Pic 9. Detail of the content of a white cell.


Pic 11. Detail of the content of white cell.


Conclusion: This hive remained weak at the end of last Autumn, the bees have chilled out due to bad weather conditions. The hive didn't grow as the same speed as the others and the bees didn't show much activity in summer time; examining empty brood cells, they don't look as clean as the empty brood cells of the survivor colony so there is the doubt of the white cells being caused by poor housekeeping.

25th of March


This is the second bag of fondant, who said that bees don't find it tasty?


It is curious, in the area surrounding the hives with bees the snow does not condense


They seem busy inside

Queen rearing plan

Draft of queen rearing plan (24th of March):

1) Leave Las Vegas as it's: 1 brood box and 2 suppers until the nectar flow.

2) At the time of the nectar flow, set the queen in lower brood box, add 1 queen excluder, another queen excluder on the top of the suppers and finally add on the top a second brood box. 
The top box of Las Vegas will act as starter, nursery and finisher hive.
If possible, set another very small entrance for the top brood box.

3) Take a frame with larvae from Acapulco and set them on the top of the box.

4) Inspect regularly to find out if the bees are starting queen cells.


Anatomy of bee in pictures


The tongue


The little hands


The pollen baskets


The wings


The head


The bottom 


The eyes


Germany: Harvest of heather honey in a Skep Apiary


Farm located between Hamburg and Bremen, Autumn (1973)


What to do with old wax


The fatbeeman makes it again, he demonstrates how to process the old comb to output propolis, bee wax and finally, foundation and all with material that you already have in your kitchen, a budget procedure for the small beekeeper that likes tinking and don't mind to get the hands dirty.  


Queen Rearing explained

Click here to read my reference , and heresee also this

Whatever you choose for rearing queens, the royal results and your increased appreciation for the miracle that is a queen bee will be well worth the effort.

All queen rearing methods are based on a biology fact: 

Nurse bees in a hive can turn one day old female (worker) larvae into queens by enlarging the young grubs' cells and feeding them a steady diet of hormone-rich royal jelly. One day larvae is not curved. 
Hence, every technique is based upon introducing tiny, still uncurled eggs to a group of queenless — and thus highly motivated— nurse bees.

It is important to notice that bee larvae become chilled at temperatures below 75°F = 23°C. It doesn't mean that the weather temperature must be above 23°C to open the hive but that if the brood gets a temperature lower to 23°C will chill out.

It is advised to choose for breeding a bee hive that's not only a good layer but one whose hive has never swarmed, whose subjects are uniformly marked and gentle, and whose drones are not solid black (a characteristic that tends to indicate a wild heritage). For this last requirement, it's wise to examine the young, still fuzzy-haired drones that have not yet begun to fly, since older black drones may have flown in from other hives.

A tip to create a nucleus or to split a hive: sets the box temporarily over a well-stocked brood chamber before smoking the bees and hammer lightly on the side of the hive, which quickly convinces the young "nursemaids" to move up into the hive.


Another tip to keep your larvae alive: you ought to keep a moist towel draped over the brood frame to prevent dehydration of the delicate young larvae.


A wee clarification: Manipulated eggs are cannibalized by worker bees but manipulated larvae is not cannibalized. 

Regarding nucleus that work as queen mateing boxes, when a nuc's queen is removed, the mini-hive must remain queenless for a day before the next pupal cell is introduced.

Terminology: 

  • nursery hive. Queenless nucleus or hive full of nursery bees which job is to transform worker bee cell to queen cells this task takes around 24 hours and it doesn't end up with fully developed queen cell, it just shapes it to the point where bees will consider it a queen cell. Since this hive is small to rear the amount of queen cells that we intend, the frame of capped queen cells need to be transferred after to a strong finisher hive to feed the queen larvae.
  • starter hive. It is similar to a nursery hive but in the starter hive the larvae is not alien to the hive.
  • finisher hive. Strong queen right hive that consists on 2 brood boxes separated by 2 suppers and two queen excluders. The queen is allocated on the bottom brood box laying as usual, the workers fill in the suppers with honey as usual but on the top brood box nursery bees look after the queen cells. Because the queen cells are already developed this hive does not need to be queenless.
  • mother hive. This is a hive used by commercial queen bee breeders. The queen is confined in a 3 frame space inside a hive using a mesh or 2 queen excluders. The apiarist extracts daily the eggs laid out by the queen an inserts a new frame with pale comb.
Queen rearing doesn't need to be complicated: the bees themselves can choose the brood cells in which they'll nourish and rear a new queen but if you want to produce a certain number of queens with the minimum possible amount of resources and sacrifying the minimum number of honey productive hives you need to plan the queen rearing strategy for your apiary.

Queen rearing in general it's beneficial for the beekeeper because it insures the production of a strong, healthy ruler that's especially adapted to a particular hive in a particular location, on the contrary, packaged queens are not always suitable to the local weather conditions since same beekeeping enterprises are based in foreign countries with longer summers so they can deliver queen stock when the local stock is still unavailable.

Any queen rearing method will produce queens but beekeepers can find some methods more suitable for them than others considering:

  1. The amount of money you want to spend in equipment.
  2. The number of queens that you intend to output.
  3. Your skills in queen management.
  4. The number of hives that you can dedicate to queen rearing.
  5. The priority that you give to honey production. 
  6. Your approach to beekeeping: scientific, recreational, business orientated, etc
  7. Your accuracy taking notes and following the bee biology.
  8. The method that uses your mentor or the people in your area.
As you might suppose it's much better to rear queen bees during a good honey flow (when many nectar-producing flowers are in bloom) the alternative it is to provide a feeder of sugar-and-water syrup.

More tips: If you cut 1/3 the worker cell that you intend use for queen rearing you help bees in development in the peanut-like queen cell.

Among the most popular amateur "backyard" methods(not much equipment needed) we can quote: 

  1. Sommerford 
  2. Miller 
  3. Double-Brood-chamber
  4. Plugging Variation of drafting.

1.SOMMERFORD METHOD (Make a hive queenless, cut the comb around queen cell and stick it to frame of a nucles)

The easiest way to raise queens is the Sommerford system, which was named after the Texas apiarist who developed it at the beginning of this century. See below a video where the fatbeeman applies this technique before you continue reading.


The first step consists on taken the queen to a nucleus,
  1. Select your best hive, let's call it Alfa 
  2. Then remove 2 frames of brood comb, 1 frame of honey, the queen, and a number of adhering bees from Alfa.  
  3. Install them all in a nucleus and tuck the brood frames snugly in the middle racks.
  4. Leave Alfa alone for 9 or 10 days. Alfa's bees will soon become aware that their queen is gone and will start building queen cells in the remaining brood frames.
The second step is to open the hive and cut the comb where you find well developed queen cells. The number and location of the queen cells is unpredictable and you might find some patches of brood quite crowed with queen cells:


Destroy any cells queens that are uncapped; destroy those cells that seem smallish or appear dark. Finally, extract the healthy cells, along with a bit of surrounding comb. Handle these pupal cocoons with great care because excessive shaking or jarring can cause a damage.
The final step is to reallocate the queen cells in nucleus:
The valid queen cells can be brought to hives or nucs to start new colonies.
As each cell hatches (usually 16 days after the egg was laid), its young virgin queen will emerge, investigate her surroundings, and establish her sovereignty in the hive. Afterwards, she'll take off on the first of several nuptial flights, during which she'll mate with a number of drones that will fertilize her for a two to three year life of egg production.
2.MILLER METHOD(similar to SOMMERFORD but we speed up the developing of queen cells by trimming the bottom edge of the frame or placing the brood cells horizontally) 

The first step consists on grasping uncurved larvae:

In order to achieve the first goal the beekeeper can try different techniques that involve different levels of queen manipulation:

  • For example, a simple way for the beekeeper to achieve this goal is to set a frame of empty drawn comb in the middle of a nuc, along with a queen, lots of bees, and other frames of brood and honey. After a week the originally empty frame is expected to be full of eggs, larvae, and capped brood.
  • Another example that involves more queen manipulation is to cage the queen using a queen excluder or a box to the empty frame so the queen is obligated to lay on it. You can use these larvae for drafting, miller, etc

The second step consist on trimming the bottom edge of the frames or to make space some how, you trim the honey and the curved larvae and you leave the uncurved larvea and eggs.  What is the reason behind? 

Because bees get naturally encouraged to draw queen cells in the edges of the comb. 

After the trimming, we set it in a queenless hive to motivate the developing of queen cells:

As some beekeepers do, you can first trim the bottom edge and after to introduce the frame in your hive queen right hive and to expect that the bees will naturally draw the queen cells (if the queen right hive is very crowed you have more chances). The benefit when it works is that you speed up the process and you don't need a queenless hive. The inconvenient is that you risk that bees will just fill it in with honey. 


The breeder extracts cuts carefully with a sharp knife along the bottom edge of the wax comb, directly beneath clusters of hatched larvae that are still in the cells. After the beekeeper places the trimmed frame in a queenless hive, the resident bees will automatically draw out beautiful queen cells along the bottom edge, and the infants within will be nursed into queen pupae that can be removed after ten days in order to start new colonies or to requeen struggling ones. 
 An alternative to cut the bottom edge of the frame is to stick a line of brood comb to the top of a frame (simulating grafting) or just placing a frame horizontally - if you place a frame horizontally the bees will choose which larvae is more appropriate for queen rearing. 


Double-brood-chamber method.


This is a low cost method that suits the small-scale beekeeper that needs a couple of queens and don't want to sacrifice the honey crop.


The first step is to set a queen excluder over the brood box, 2 suppers and another queen excluder and a queenless brood box. The top brood box must have unsealed brood.

Secondly, in due time the workers will raise several queen cells which can then be collected.

Queen Bees for Sale


  • Rearing queens for the market requires considerably more skill, greater precision in timing, and to the minute record keeping.
  • Because the biggest demand for queens usually comes in the spring, most commercial rearers live in warm climes, where they can get a jump on the season.
  • Techniques vary slightly from one apiarist to another, but breeding marketable queens is a process that can start as early as February and continue through November in some regions. 
  • It normally involves grafting (or transferring) specially selected larvae into manufactured wax cups that are kept in special "nursery" hives. The finisher hive can replaced by an incubator.
  • The basic system was first laid out in G.M. Doolittle's 1888 book, Scientific Queen-Rearing, in which the author recommended using a whittled-down toothpick as the grafting tool!

  • The process of large-scale queen breeding then begins in the mother hive: a brood chamber containing goodly quantities of young bees, honey, and pollen. 

First, the queen bee is confined to one brood frame by a screen excluder on either side, the queen stays in that narrow home the rest of her days, continuing to lay eggs on the only frame available to her. 


Every day, the breeder removes a frame full of one-day-old eggs and places it outside of the excluder and sets a new frame for the queen to lay. This technique provides a continuous source of eggs which laying time we know. 


Drafting:
For the large-scale breeder of queens, grafting is the method of choice: It's not too expensive, it's time-tested, and when done correctly it boasts a success rate of 80 to 85%. But it's not particularly appropriate for a small-scale beekeeper who'd like to raise maybe a couple of new queens each season for replacement or expansion purposes. 


Wax cups: The breeder makes a series of miniature wax cones or buy these tiny cups to house the embryonic queens. You can do it yourself by dipping a quarter-inch wooden dowel with a tapered end alternately into hot beeswax and cold water.

After the breeder affixes approximately three-quarters of an inch apart, in a row of 12 or so along a wooden bar made to fit inside a standard hive frame. When the bar is "primed" by brushing its surface with hot water, the cell cups stick to it readily. 


Then the grafting needle is carefully slid under each almost microscopic white embryo to lift the specimen

 
from its compartment in the comb frame to the new cell cup, where it is "floated" onto its royal-jelly bath. The breeder uses a special tool with a curved end.

Second, when three bars full of cell cups have been grafted, they're slipped into slots inside a heavy frame, and the whole unit is placed in a one-story "starter hive" containing eager young nurse bees and plenty of pollen and honey stores but no queen.
After spending just one day in this hive, the cups are transformed by the workers into the characteristically peanut-shaped queen cells, which are then ready to be transferred to a finishing hive

This final box features two brood chambers, with a laying queen in the bottom (among the usual frames of pollen, honey, and brood) and an empty nest on the top, separated by an excluder. Once the queen cells—hanging neatly from their barsare placed in this hive, the nurse bees instinctively nourish and tend them until they're completely capped usually by the fourth day. 
Then the time must be watched closely, since it's essential to remove the mature pupae from their communal incubator before they hatch. Otherwise, the first queen to leave her cocoon will methodically rip open the other cells and kill her unborn sisters.
On the tenth day, then, the cell frame is removed and the unhatched cocoons are very carefully detached so that each can be placed in an upright position in a nuc where the virgin queen can be born in peace.

Plugging Variation(Vern's method)


Plugging is grafting made easy.

This process begins with the selection of a mother queen from those available in the breeder's apiary. 

After, a nuc is put together to incubate the queen cells. 


First, heat up a pot of beeswax use that warm adhesive to "prime" the cell bars where you are going to stick the larvae. The wax must, of course, be completely melted but it can't be too hot, or it will asphyxiate the larvae when they're attached to the bar. With the cell bars standing ready, you put a pot of water on to boil and goes out to fetch a frame of uncapped and uncurved brood  from the original breeder hive.


After heating the tube in boiling water you place the tube over the opening of a comb cell containing a young larva and, with a swift twisting and lifting motion, pulls the grub along with its rich royal jelly and a small supporting section of comb into the end of the tube. Then you blow sharply through the tube to dislodge the bundle into his hand so that he can deposit it carefully on the cell bar, where it will adhere to the warm wax. 

After filling three cell bars with larvae, you fit them into a frame and returns it to the nursery hive, where the bees cap and tend the royal cells for 24 to 30 hours. 

Late the next day, he transfers the cell frame into a special finisher hive that he designed to ease strain on his back. This split-level arrangement features a bottom story of two brood boxes that are divided in the middle by a queen excluder. While the queen is confined to the rear portion, which has half-inch ventilation ports/drone escapes on two sides, the front half serves as an area for honey storage and an entrance way for the bees. On top of the front section are stacked two or three honey supers. In the uppermost story of this "honeybee high rise", the frame of newly plugged queen cells is sandwiched between other frames of brood and honey and a large gallon-jar feeder covered by an empty tin can tops off the entire structure.


On the tenth day, the cells must be separated very carefully before each is placed in a queenless colony or nuc, where the virgin will soon hatch. 


Click on play list to see all the 5 videos